Screwing I-joists to the outside of a wall—really—makes a lot more room for insulation on a deep energy retrofit in NW Connecticut
OFFICIAL TRANSCRIPT:
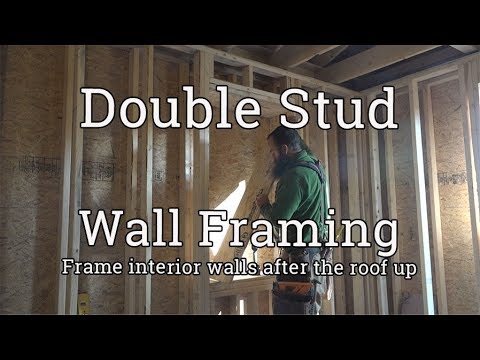
Passive House certification is like a badge of honor for designers and builders. It requires extreme airtightness and energy efficiency, and usually involves very thick walls.
Retrofitting an old building to Passive House standards is no place for sissies. This cabin will get a modified Larsen Truss system where 12 inch engineered I-Joists are fastened to the outside the walls and roof.
Extreme air tightness begins with taping the wall sheathing
Now, it’s time to thicken the walls and roof.
As they work along the wall, Charles repairs nicks in the sheathing tape that occurred during roof construction.
Tony pre-sinks screws in the flange where the top plate is
The joists sit on a ledger at the bottom and align with the rafters at the top to keep a continuous thermal cavity.
To avoid thermal bridging to the inside, the new framing is offset from the existing framing.
The wide flanges are screwed into the top plate with six inch structural screws. The joist is then adjusted plumb, and screwed into the rim joist.
After lunch they move to the sunny side of the house, where they keep installing I-joists to the outside, skipping over the window openings.
Cutting the I joist is done with a couple of saws and a couple of jigs
Notching the bottom is done with a 7-¼ inch circular saw, adjusting the blade depth to the flange width. The length [MEASUREMENT] of the I-joist is pulled from that notch, which represents the top of the cleat, to the long point of the roof angle.
The cutting jig is made with a couple of pieces of plywood and a 1x fence. The lower piece sits between the flanges and the upper piece overlays them. A 1x3 fence along the top makes the jig fast to place and adjust. The angle is the complementary angle to the roof pitch.
The jig is slid along the joist to the cut mark. The flanges are scribed and the jig is slid left until the lower piece aligns with the flange marks. After the jig is clamped in place, the upper piece acts as a saw guide and the lower piece indicates the cut.
For cuts across an I-joist with wide flanges like this, they turn to a bigger, 10 inch circular saw.
Filling in under the windows uses up some of the short pieces and requires a jig with a ¼ inch per foot slope.
Here, Tony is making one. He has offset the two pieces of plywood the distance from the saw blade to the edge of the saw table. And he screws them together. A scrap of OSB is the fence for this jig. Looks like it works.
Now they fill in the window framing, putting the I-Joists on the line and screwing them into the wall.
Straighten the wall with a stringline and shims
Because the existing framing and structure is a bit on the wonky side, they run a stringline down the walls at the bottom and top. They check along the wall to see where they will need to adjust with shims.
Later, the window opening will be boxed out with plywood and shimmed plumb, level, and square. But first, we are going to head on the roof to see how they pull off that part of the puzzle.
—Ben Bogie (Built to Last Design& Build) is going to be the builder of the 2017 ModelRemodel, which breaks ground in the spring of 2017

: Put the Window In the Hole")