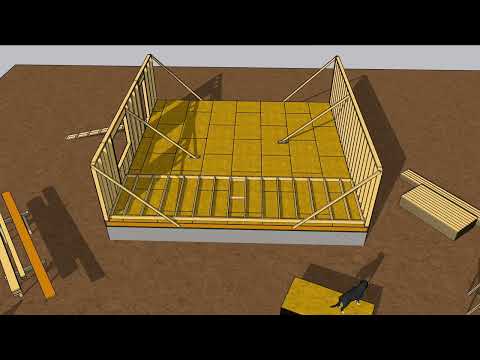
In earlier animations, we went over how to frame a simple floor— and one with added features. Today, we’re going to install a subfloor over that floor frame.
Establish a straight line for subfloor panels
The long axis of the subflooring goes perpendicular to the joists, so snap a line across the joists 48 inches from the rim.
If the “groove” edge of the tongue and groove subfloor panels align along this line, subsequent rows will most likely line up perfectly.
Now, you can spread a bead of subfloor adhesive along the joists and the rim. Keep the bead at least three inches shy of the 48-inch line to protect your tape measure from a sticky mess later.
Use subfloor to maintain floor framing layout
Along the joist that breaks at eight feet, keep the adhesive along the edge of the joist, not the center, because the panel will end at the center of the joist.
This completely illustrates the significance and meaning of “on center.” When carpenters say “16 inches on center,” it means that 16 inches falls at the center of the framing member. Not the edge of it.
Make sure the panel is breaking correctly on that first joist.
There will be no wiggle room at the near end due to the blocking, but at the far end, it is important to make sure the joists are where they are supposed to be—not bent or curved.
Make sure the eight-foot joist is centered, and put a nail in it.
Pull your tape measure along the top of the sheet, nudging the joists to center on 16, 32, 48, 64, and 72, and nailing them.
Make sure to do this right, and do not skip this step. Do this for every sheet along the first row of sheathing.
Lay more beads of adhesive along the joists and rim, and place that second sheet.
Most manufacturers specify a gap between sheets; you can often use eight-penny nails as spacers.
Continue through the first row, cutting the last piece to fit.
Install subfloor sheets staggered
Use a half-sheet to begin the second course. This will stagger the sheets and strengthen the subfloor, which acts as a structural diaphragm for wind, seismic, and other forces.
Again, pull a layout all the way from the end and make sure all of the joists break correctly.
Continue running courses and working around the stairway.
If the sheets break right, run them right over the stairway, marking the edge of the framing when you do.
Cover holes in the floor for safety
If you can’t cover the stair hole with installed subflooring, use a spare sheet with some stuff on top of it to keep people from falling through.
Fill in the pieces of the cantilever and add a rip of subflooring to the other cantilever. If you’re lucky, the corner you cut off will fit the opposite end.
With a flat, solid subfloor, we are ready to dig into this bunk of studs so we can get to wall framing.
")
")