Adding headroom in a short basement means digging down and shoring up the footing. If there is no footing, it also means adding one. The floor will be an insulated slab heated with hydronic tubing. This insulated slab, it turns out will also be a structural slab.
Welcome back to Building Resilience, a show about resilient design and construction. Today, we’re heading into a basement with almost enough headroom for living space.
Almost.
Structural upgrades are part of any remodel
Michael Anschel: So, on this project, there is a lot going on, some major structural changes on the first floor that impact the lower level. But what's really exciting are the big structural changes taking place in the basement.
We're going to be removing 19 inches of soil to drop that basement floor to make it a much more comfortable living space. And, we're going to add in insulation under the slab, we're going to add radon mitigation, we're going to add some in floor heat, and a capillary break. So in order to do this, we have to make some changes to how the house is currently supported.
And we're going to do that in two primary ways. So the first way, uh, is going to be to replace the primary footings that hold up the central bearing beam of the home. Uh, and to do that was pretty easy. We cut open the slab. We dug down some ways. We poured a new footing and we were able to replace all of that.
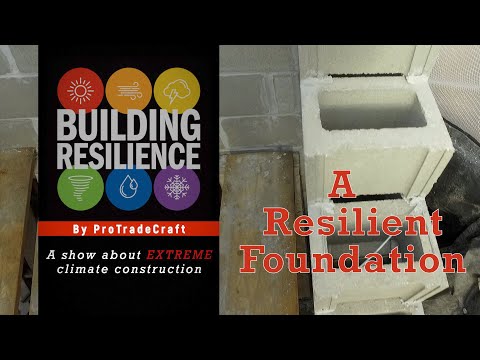
Creating a retrofit footing using curbs and a structural slab
When it comes to the perimeter though, it gets a lot more challenging. All right, so here's our foundation. It's coming down. You can see there's no footing underneath there. We've excavated soils at a 45 degree slope so that we're keeping this stable. And we formed up our curb. And in our curb, we've got rebar.
Running two directions and this bar that runs out into what will be our structural slab. Now this is where it gets really interesting. This slab is resisting the lateral pressure from this foundation. So this slab is a structural slab. Often times when we talk about basements and drain tile, we're cutting open that slab to put in drain tile and what not.
In this case, cutting that slab would be bad news bears. We don't want to do that because this slab is what's holding up the curb, which is what's holding up the foundation. Think of it as like a footing in space.
Extruded polystyrene is a great choice for slab insulation; this one is near zero GWP
OK, If you say so. In designing the system for the insulated and heated slab, the architects chose Expanded Polystyrene because it is better for climate change, but EPS isn’t as good under a slab as Extruded Polystyrene, XPS.
MA: So this is Styrofoam. It's a product that we're all familiar with, extruded polystyrene from DuPont. This is a new product code. This is their ST 100 product. Um, 25 PSI and a 0. 1 percent water absorption. So it's meeting our requirements for compression, resistance and resistance to taking on moisture.
However, this one also uses this new blue edge technology and is a zero ozone depletion product. So. We're now at a near zero GWP product that has all of the characteristics that we need for the application at hand.
Installing Styrofoam before pouring the slab
And the application at hand is slipping those sheets under some rebar to start this insulated floor the right way. That begins with bending up the rebar. But before that, grading the gravel and filling the low spots. And spreading it again.
Let’s take a minute to dissect the layers under the future slab because it can be a little confusing.
Where's the capillary break?
MA: This is a typical basement. We've got our sand; over sand, we've got some crushed rock ¾ of an inch in diameter or larger that's been washed.
Over that, we've got 2 inches minimum of extruded polystyrene, and then we've got a sheet of plastic.
So here's the question: which one of these is the capillary break?
Is it the plastic? Nope.
Is it the foam? Nope.
Is it the crushed rock? It is. You got it. That's right.
And the reason that works so well is while sand particles are really close to each other, water can work its way up through the sand. But with the crushed rock, the voids are too large for water, which is fairly sticky stuff, to work its way up. So, the rock is your capillary break.
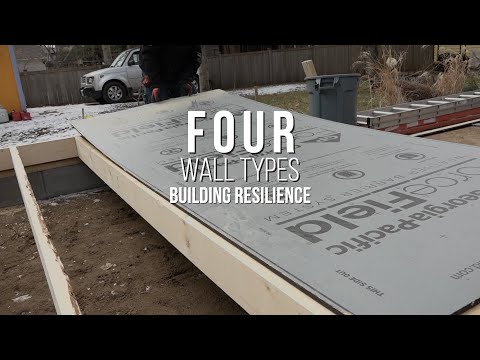
When laying the big perimeter sheets, Joseph smoothes the gravel below to create a perfect bed for it to nap in. Really, he wants a solid and level base for the hydronic tubing people and the concrete crew to tromp around on. Next, they check the elevation of the sheet with a laser.
If everything checks out—which it does—they move on to the next sheet, scooping excess gravel toward the door. With the perimeter done, they begin filling the smaller pieces around the footings and plumbing lines coming through the floor. And it takes a lot longer than it looks like here. That leaves the sloped section connecting the two slab elevations. Before anyone can form up that curb, someone needs to insulate it. Once again, that begins with grading and cutting pieces to fit. Placing the sheets and tucking them into their little beds.
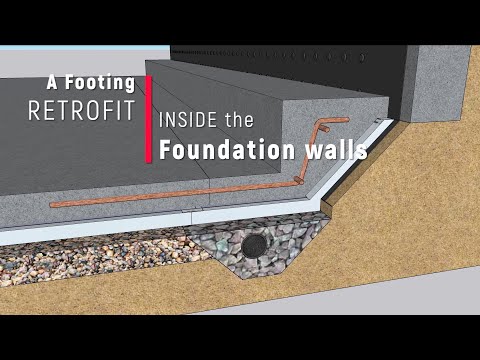
Many layers in an insulated slab assembly
Before hydronic tubing is stapled in place, the seams are taped to help the slab cure slower. Let's peel it back again to clarify what the layers are—and what they do.
We begin by covering the foundation wall with a dimpled sheet that will direct water from outside down and into the drainage trough.
We dug at 45 degrees away from the foundation to keep the undisturbed ground undisturbed.
We also included an interior perimeter drain trough. First goes a drain pipe, which is surrounded by crushed rock and carries water to a sump pump, which pumps it away.
The earth is compacted before adding a layer of crushed stone. This is the capillary break that keeps groundwater from wicking into the concrete.
To form the curb, they first add insulation, formwork, and rebar, and the curb is poured.
Over the stone goes the styrofoam. The seams are taped to prevent soil gas from leaking in and to help the slab cure slower
Hydronic tubing is stapled into the Styrofoam, and the slab is poured.
It is a structural slab because it provides an opposite force against the force pushing the foundation walls into the basement. So, it is structural. It is dry, and it is a warm floor. But that’s not the only warm floor in the house.
Hydronic tubing heats the slab, and the first floor framing
The basement ceiling is also a floor, and while the plumbers were installing tubing under the slab, they also stapled it up under the first floor. The hydronic tubing is stapled into the joists about two inches below the subfloor. Reflective bubble wrap radiant barrier will reflect most of the heat into the subfloor, and styrofoam insulation between the joists will further restrict heat flow. The insulation is friction fit between the floor joists and will be covered with drywall.
Next time: Hydrogap-SA Self-adhered WRB from Benjamin Obdyke
And speaking of coverups, that’s what we’re going to do next time. We’ll be all the way across town at this nifty little house that’s getting new siding and windows. And because sequences of construction are not always ideal in remodeling, we’re going to install some of the windows BEFORE installing the Hydrogap SA WRB. That “SA” stands for self-adhered, and that means WRB is also the flashing. The crew will cut wide strips to flash the opening, and when they come back later with big rolls of Hyrdogap, they’ll seal to the wide flashing strips.