Furring and foam on the INSIDE for better walls in really cold places.
Problems suffered by traditionally-built walls are magnified in very cold climates. Air leakage, moisture diffusion, thermal bridging, and less-than-ideal R-value have much bigger downsides when there is a hundred-degree difference between inside and out temperatures.
In this video, Ilya Benesch, a carpenter at the Cold Climate Housing Research Center (CCHRC) in Fairbanks, Alaska, shows how to use furring, foam, and a tightly-sealed air barrier/vapor retarder to produce walls that reduce energy use and resist mold and rot while producing greater indoor comfort.
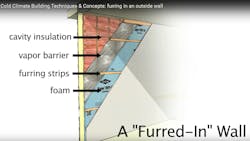
The idea is to create a tightly-sealed barrier to air and moisture at the face of the studs and install 1 1/2-inch horizontal furring on top of it. The furring creates space for an additional 1 1/2 inches of foam on the inside of the studs and reduces thermal bridging by preventing studs from contacting both the sheathing and drywall.
Certain details, such as the use of a poly vapor barrier and proportion of R-value placed inboard of the vapor retarder/barrier, are specific to climate zones 6 thru 8 in Alaska, a heating-dominated climate where air conditioning is extremely rare.
What follows is a rundown of what is how to do it and where to find it in the video—plus some links to additional information.
Section thru Wall (1:00)
This is a way to get a little bit of extra bit of energy performance out of a standard 2x6 wall. The illustration shows the buildup: batt insulation in the bays, a vapor barrier/retarder over the studs, and foam insulation between horizontal furring.
Using blown-in fiberglass insulation in the bays will yield better results because it creates uniform fill with no voids.
R-value (1:20)
The 2x8 wall on this jobsite has blown fiberglass in the stud bays with 1 1/2-inch foam insulation on top.
By the numbers, it would be R 35-40, which is a very good R-value for interior Alaska, where fuel costs are high and winters are long.
Air and Vapor Retarder (2:20)
A poly vapor retarder is not recommended in most parts of the U.S., but when properly detailed it works well in the climate zones (6, 7, 8) specific to Alaska where residential air conditioning is not generally needed in summers.
Installing the Poly (3:10)
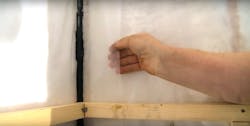
The industry standard in our area is 6 mil poly, an air barrier/vapor retarder that stops moisture from diffusing from the interior to the back of the sheathing, where it is apt to condense.
The poly must be carefully sealed against air leakage because leaks can transport a large amount of moisture into the walls (more than is likely to occur because of diffusion).
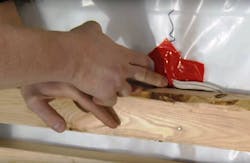
Laps between pieces of poly are sealed with TREMCO acoustical sealant. Sealing should happen over studs or another solid backing—the inspectors in our area check for this.
Penetrations (3:55)
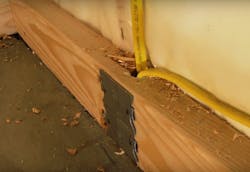
Plan ahead to minimize the number of holes through the air barrier/vapor retarder. Some holes are unavoidable—for example, at wiring and plumbing penetrations. Those penetrations should be carefully sealed with tape.
Wires should penetrate at studs so they can be stapled in place and taped against a solid backing. Do not bring them through the center of a bay—where they can wiggle and it’s hard to tape.
Furring (4:45)
Furring should match the thickness of the foam being used. It’s convenient to use 2x2s or ripped 2x4s because it matches the thickness of 1 1/2-inch foam board. The furring is run horizontally, which has the advantage of reducing the amount of heat conducted through the studs because the area where furring contacts the studs is very small.
If you rip foam insulation board in half it will be just under 24 inches wide. Space your strips at that dimension and the foam will fit tight and there will be almost no waste.
Layout (5:35)
It will be easier to snap the location of furring onto the studs before installing plastic—which is clear so the layout will show through.
Drywall (6:00)
With furring spaced 2 feet apart and the drywall run vertically the code requires 5/8-inch drywall. The US Gypsum Council’s Gypsum Construction Handbook will tell you the spacing and orientation you can use when installing drywall.
Provisions for Fastening (6:35)
The furring provides a space for foam insulation and nailing for drywall and trim. To provide nailing for base trim the strip at the floor should be a full 2x4.
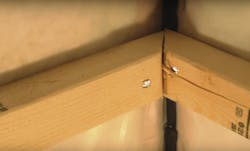
When the project calls for baseboard heat use a 2x6 instead—your plumber will thank you. Furring should be mitered to provide better landing at inside corner studs. It’s best to nip off the corners so they aren’t sharp enough to tear the poly.
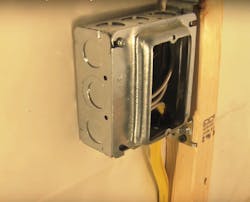
Electrical (7:50)
It’s best to minimize the number of electrical boxes in exterior walls. Fewer boxes mean less cutting and fitting of foam board, and there is more insulation too.
With 1 1/2-inch furring the boxes cannot be very deep so when there are a lot of wires we use a taller wider box with a plaster ring to bring the opening down to the size of the cover plate
Blocking (8:50)
Be sure to include blocking for cabinets, towel bars, and anything else that will be fastened through the drywall.
Keep Subs in the Loop (9:05)
Be sure to inform subs that the walls will be furred so that they will know to add the thickness of furring when locating fixtures. You do not want the toilet flange—or anything else—to be too close to the face of the drywall.
Nail Plates (10:05)
Some of the wiring will be run in the space between furring. By code, there should be 1 1/4 inches between wood and wire where the wire passes through studs and furring.
Use nail plates in those locations where the distance is shorter or any location where the distance is in doubt.
Insulating (10:25)
Once the furring and wiring is in it’s time to install the insulation. Any type of 1 1/2-inch foam insulation will work in these furring spaces.
R-Tech Insulfoam has a backing and the foam is pre-scored so you can split pieces down the center by folding the foam and knifing through the backing—which saves you the trouble and mess of cutting on a table saw.
Avoiding Condensation (12:20)
In our climate, you do not want to put more than 1/3 of the total insulation R-value to the warm side of the vapor retarder. If you go beyond that the face of the poly may become cold enough for moisture to condense if it reaches that area.
Dealing with the Inspector (13:00)
If this is your first time furring an inside wall in an area where the code official is not familiar with it—get him/her on board with it first. Code officials are like bears, they do not like surprises.
—Ilya Benesch is a carpenter for the Cold Climate Housing Research Center (CCHRC) in Fairbanks, Alaska.
