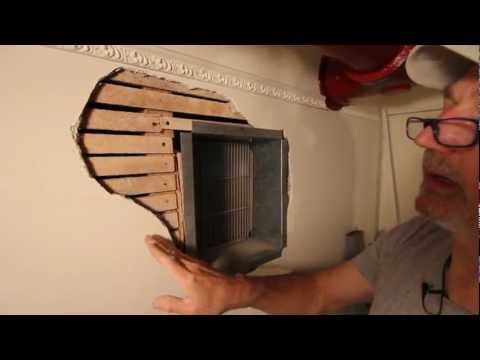
Here's another video with Crispy Vine, the professional patchman who will spill a few more of his trade secrets just for you. Crispy showed us how to do a little drywall patch in the last video, and now he has to work on something a little bigger. Look at this nasty crack in the wall!
Making a bad drywall patch good again
So, here's a different kind of patch; this one was pre-existing. Here, it looks like there's a crack you might not be able to see through the camera. There's a pretty big indent, so we're probably going to bust this out all the way. I did a little knocking on the wall to see where my studs are at. Looks like the stud's going to be on this side of the outlet box, so I'll try to make this one as smooth as I can along the stud line. That way, I can seal this pre-existing drywall and then add in for the new patch area.
Get the wall ready for work and cut the hole
First, we want to prep the wall by removing the outlet cover. We'll run some painter's tape over the outlet to avoid getting any mud on it. Using a two-foot level, we'll make some straight lines. You'll score the paper with a utility knife to get a clean cut. Then, to cut through the drywall, I'm using a jab saw. It's a handy tool you can use to poke through the wall and cut. Trying to be careful here for the electrical line.
Whatever you do, DON'T cut the electrical wire
To keep away from the electrical line, Chris cuts three sides of the hole with a drywall saw and scores the fourth side with a knife. he then breaks out the drywall revealing the Romex that would have been damaged had he ran the saw up the side of the stud.
Drywall screw guns are almost goof-proof
Here, I have a cordless drywall screw gun that allows you to set a depth so you don't go too far into the drywall. You more than likely won't have this at home, but it's definitely worth the cost if you're out in the field. This is pretty much what you would have at home: a compact drill or one that attaches here. But this is what I'll show you how to do it with just so you have an idea.
I'm going to tighten this edge up real quick. So when you do patches like this and need to actually use backing in pre-existing drywall, you're going to want to tighten up all your edges. Same thing if you came across through here, you want to do all of the pre-existing holes.
Install wood backing for fastening the patch
For this backing, I'm just using 3/4 inch baseboard, just leftovers from the job site. We're going to want to take this backing here to the more flush side, and we will apply our first screw. Just want to hold it a little tight, make that connection, and you still want to make sure that you get this edge gone. That way, you don't create any humps.
Chris is using 1-1/2 inch drywall screws, tapping easily through the gypsum and drilling themselves into the wood.
I will leave about an eighth of an inch gap to ensure my piece fits in snugly.
Cut the drywall patch
So here, I get my tape measure and start making it smooth. If you'd like, I'm just going to end up leaving about an eighth of an inch gap. That way, you can keep it pretty tight, but as long as you fill up the majority, you can always pre-fill holes before you start adding the tape. But now, I know I'm probably going to need about an 8-3/4 inch x 17-1/8 inch piece. So here's my 17 and an eighth. I push my finger here, ensuring that I'm just right there at the eighth mark. I'm just going to simply drag my blade.
Now that I have my line here, I'm just going to push back on this end, and it will snap perfectly down the line. I just take my blade here on the backside, bend, and come straight through. Now we can tighten this up if we would like; this way, it ensures that it lays in there nice and smooth. And our factory edge on this side slides in nice and easy. The factory edge is the one with the paper wrapped around the border. It's also slightly indented or depressed to allow room for tape and a thin coat of mud.
Alright, so we're going to take our 8 and 3/4 cut here, and you'll hear this snapping sound after the cut.
Screw the patch into the hole and mix the mud
This is going to fit right here in our hole. Perfect!
The patch is tight, but I will pre-fill the edges to make it perfect. I'm using a 2-inch putty knife to mix my hot mud to the consistency of peanut butter – smooth, not chunky. I'm applying a filler coat to drive mud into the joint. So, in seeing how large this was going, I'm going to need to be pre-filled. I have decided to go with a larger knife.
This way, I can pull everything all the way through for both sides and leave me with a nice flat area. Then when I come to tape this here, it's going to be a lot more smooth. So, I'm just going to let that have a little bit of time to dry. Luckily, we're using the 5-minute mud, and we'll come back.
I'm taping all the joints with ultra-thin mesh tape. Sometimes the tape does not want to stick, so you must apply a little bit of mud as you go along. This time, it's sticking on there just fine.
I'm going to apply the first coat to this patch. We've already taped it and pre-filled underneath. Now I have my 12-inch length; again, just going to apply it as close as I can to this light, covering the edging from when I pre-filled. So, you just what they call busting it out. So, I'm just going to bust it out here a little, and I'll start from this awkward angle where the actual outlet is.
Feather the second coat to avoid sanding
Alright, I'm going to fill in this second coat here. I'm going to try to still lay it as flat as possible. This is usually how you're filling in the most. I might even get it pretty close to a 45 degree angle to the wall. When you coat really thin like this, it avoids having to sand anything. Everything should be nice and smooth.
This is why I typically bust out with a thicker knife just so that way I don't leave any edges or humps in the middle. This mud for the quick set is going to avoid some shrinking back; it'll kind of hold its form a lot more than just regular mud out of the box that typically tends to sink into the gap.
Alright, so I changed it out to my 12-inch knife just kind of how I was speaking upon so it doesn't create any humps. This way, I can pull it really tight from this angle here; you get that, then it avoids making these edges a little easier.
We are using plus three from USG Sheetrock brand, same people that make this handy dandy mud pan here. This stuff is probably the smoothest product that USG has. It comes from Home Depot; it's definitely lighter to sand than any other products. I have already premixed it here, and we are going to do our third and final coat on this patch.
Alright, last time I showed you how to do a small patch and this time we moved on to a much larger patch. In the next video, I'll show you how to do some texturing.