Q: Is Truss Uplift a Carpentry Problem or a Drywall Problem?
Trusses are a fast way to get a roof framed. They are often less expensive than stick-framed roofs because they use smaller-dimension lumber, and they go up faster. And, trusses are flexible in accommodating different design needs, so they tend to be the darlings of designers.
Trusses have been around for a long time, and so has their primary drawback: truss uplift.
Truss uplift is not a structural problem; it's a cosmetic problem caused by temperature differential
When a newer house shows signs of interior cracking at the ceiling of the top floor in the winter, this can normally be associated with truss uplift. Roof truss uplift occurs when the bottom chord of the truss is exposed to significantly different moisture and/or temperature conditions than the rest of the roof truss. Because the bottom chord of the truss is buried in heavy insulation, it experiences different conditions than the top chord.
Dry wood shrinks, moist wood expands
When moist air from the inside escapes into a cold attic, the moisture condenses on the trusses and roof deck. If the temperature is below 32, it also freezes. When the temperature rises above 32F, the moisture soaks into the wood. The dampness caused the top chords to expand relative to the bottom chord, which was warm and dry all winter.
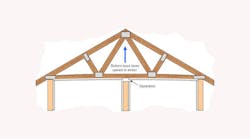
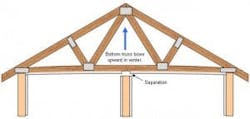
This differential movement between the top and bottom chords causes an arch in the center. Because theWhen the trusses arch, they pull away from the top plates at the interior partition walls, running at right angles to the trusses. (Walls that run parallel to the trusses are also susceptible—especially those closest to the trusses.)
This movement can cause a simple hairline crack or it can create large gaps along the corners, but it is a cosmetic problem mostly occurring in homes in cold climates.
The ceiling/wall cracksAnd then the same thing happens next year.
You can't stop truss uplift, but you can stop the cracks that result
Truss uplift is not truss uplift if the homeowner can’t see it. I think the best approach is to stop the truss uplift from having an effect on the drywall joints—let the trusses move. If the truss can move and the drywall bends, no crack will result, and the homeowner will be happy.
Most truss movement occurs over a period of time, so to prevent cracks, you must allow the drywall to flex near the corners.
Three ways to fix an existing problem
Some of these solutions are more difficult (and therefore more costly) than others.
1. Disconnect the tops of the interior walls from the trusses.
- Remove or cut free the nails from inside the attic.
- Remove all of the ceiling screws within 16 inches of the corners at the center partitions and all the wall screws within 8 inches of the ceiling along the wall.
- Patch the holes in the drywall with the drywall joint compound and repaint the walls and ceilings.
2. Install crown molding around all the second-floor ceilings, nailing the trim only to the ceilings.
- This procedure would cover the cracks and maintain a good-looking ceiling corner. Note: When installing the crown molding in this manner, remember to paint the trim and drywall in the winter months so that there is no paint stripe at the bottom of the trim when the trusses lift next winter.
3. Change the way the attic is insulated—another costly and invasive approach
- If the insulation is moved up to the roof deck, a conditioned attic will be created, so the temperature and humidity will be consistent. In homes where the attic is part of the conditioned space—typically with spray foam against the roof sheathing—truss uplift problems are much less likely.
How to prevent the problem in new construction
The key to preventing truss uplift cracks and screw pops in the first place is to avoid nailing or screwing the ceiling drywall to the bottom of the trusses at or near the intersection. When building a new house, the framing contractor should secure the interior partitions to the trusses with truss clips. The clips attach to the tops of the interior wall partitions and are then fastened through the slots to the trusses.
The clip fasteners are not driven tight, which allows the truss to move without pulling on the wall. This keeps the partition wall stable and plumb and secures the rafters at the proper on-center spacing.
To prevent cracking of the drywall, the drywaller contractor should float the corners between ceiling and wall. Do not screw or nail the drywall to the trusses within 16 inches of an interior wall and within 8 inches of the ceilings on the exterior walls.
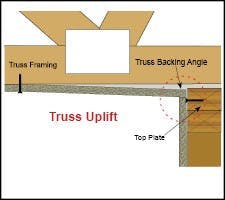
Instead, fasten the ceiling drywall panel to blocks of wood nailed to the top plates of the wall (not to the trusses) or to metal clips or continuous angles that are attached along the tops of the interior walls.
The truss will still arch, but the movement is gradual, so the drywall can flex slowly. As the rafter moves up, the drywall along the wall/ceiling intersection bends but stays in place and doesn't crack.
Use a Truss Backing Angle
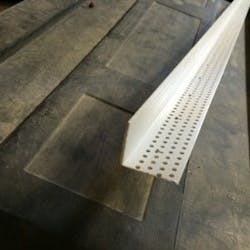
Trim-Tex has a product called a Truss Backing Angle, which is installed before the drywall is hung and helps prevent truss uplift.This means that the drywall is backed for its entire length and can easily be fastened anywhere along the edge as long as the fasteners don’t go through the angle and into the truss. The screws start very easily in the vinyl-engineered extrusions, which speeds up production.
—This is a lightly edited version of the article "Truss Uplift Cause and Solutions," which first appeared on ThisIsDrywall.
About the Author
Myron Ferguson
Myron Ferguson, aka, @thatdrywallguy, is an old friend of ProTradeCraft. He loves drywall so the rest of us don't have to (thank you, Myron). You can watch more of his videos on his YouTube channel or at ThisIsDrywall.com


