Stair Trim-Out (6) — Installing the Newel Posts
After mounting the plates I marked and bored a hole in the center of the bottom of each newel post and screwed in the lag bolts, leaving about 1/2” of space between the bottom of the posts and the head of the bolts.
I turned the posts over and slid the bolts into the slot to check the fit and position. If the fit was too tight, I backed out the lag slightly. If it was too loose, I tightened the lag. Using a rubber mallot, I tapped the posts into their final position, making sure they lined up with their masking tape outlines.
That took care of the top four newels. The other four newels need to be notched around the stair framing.
The two bottom, or starting, newels needed to have one corner removed so that 1/2 of the post sits in front of the stair framing and 1/2 sits beside it.
This means I need to remove a piece of the bottom of the newel that is approximately 3” x 3” x 7-1/4” high; the back, inside quarter.
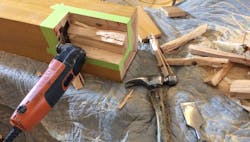
The other two newels need to have 1/2 of the bottom removed, a piece approximately 6” x 3” x 7-1/4” or more, so that the other half sits outside the stair framing. I used masking tape to mark where I needed to make the cuts.
This was more visible than a pencil line and would eliminate chipping when I cut.
I made the initial cuts with a circular saw and finished with a pull saw, an oscillating saw and a chisel.
Since the treads and risers are going to be fitted around the newels, the cuts didn't need to be perfect, they just needed to be straight. Once the material was removed, I positioned the newels and lag bolted them from the inside to the stair framing, making sure they were rigid and plumb in both directions, using shims where necessary.
A couple of views of the newels with Treads and risiers installed.
This system consists of a metal plate with a sloped slot, a lag bolt, and four long screws.
First, I laid out the newels around the stairwell and marked their location with masking tape around the perimeter.
Here are a couple of simple flow charts to visualize the choices:
Sources:
- Efficient Windows Collaborative
- Building America Solutions Center's Complete Window Replacement Guide
- NREL's Measure Guideline on Wood Window Repair and Replacement
About the Author
Christian Whalen
Chris Whalen is the owner of Black Mountain Company, a renovation, building, and woodworking company in Missoula, Montana. He is also a member of ProTradeCraft's technical advisory team.
