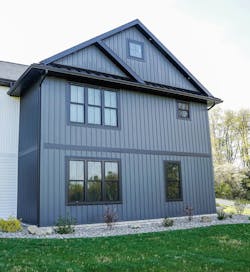
The distinct vertical lines of board and batten vinyl siding make it a versatile option for home exteriors, offering a unique, one-of-a-kind look for a home’s facade. Board ‘n batten is commonly paired with horizontal siding, shake and shingle, or manufactured stone to add distinctive accents to exterior areas such as entryways, gables, porches, dormers, and buildouts.
Installation procedures are similar to horizontal siding, but there are a few differences. These guidelines will help ensure a professional, durable installation.
Before you start, keep in mind:
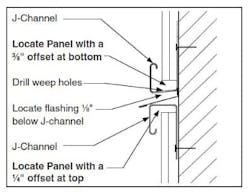
Vertical siding panels and all accessories require space for expansion at both top and bottom, with more expansion in the downward direction. EVERY panel should be placed with a 1⁄4" offset from the top and 3⁄8" offset from the bottom. Be sure to deduct the cut backs from measurements.
All vertical siding panels and accessories are to be fastened by placing a nail, staple, or screw in the uppermost end of the top slot with all other fasteners to be placed in the center of the slot, every 8" to 12" apart.
If temperatures are under 40°F, you must add 1⁄8" to each of the cut back measurements mentioned above.
A. PREPARATION
1. Substrate should be rigid and level – horizontal solid wood furring strips or solid nailable sheathing will be required in new construction using rigid foam or fiber sheathing. Horizontal furring strips will be required in all installations applied over existing siding to create a level surface. Position furring strips every 8" to 12" on center.
2. Establish a starting base line by snapping a level chalk line 1" below the lowest point of the substrate. Install J-channel and/or flashing along chalk line as a starter course.
B. ACCESSORIES
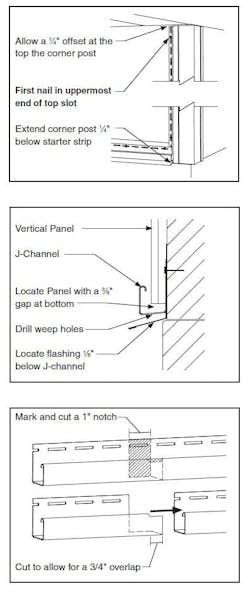
1. The corner post must be cut and installed to allow for a 1⁄4" offset at the top and with a 1⁄4" extension below the starter strip to allow for expansion and contraction.
The first fastener should be placed in the uppermost end of the top nail slot. All other fasteners are placed in the center of the slot, every 8" to 12" apart.
Do not fasten nail tightly to substrate. It is critical for the corner post to move.
2. Installation of J-Channel
Flashing is required behind the J-channel horizontal starter course, leaving a 1⁄8" offset between the bottom of the J-channel and flashing. Install the J-channel with flashing along the chalk line previously established.
To continue the J-channel horizontal starter course, the J-channel must be notched to create an overlap. Trim the nailing flange back 1" and notch as shown in illustration. The adjoining pieces should only overlap by 3⁄4" to allow for horizontal expansion.
The J-channel starter course will need to be cut back to allow a 1⁄4" offset at each corner post to allow for horizontal expansion.
Fasten every 8" to 12", using the center of the nail slots. Do not fully tighten.
J-channel starter course is to be drilled with 3⁄16" weep holes every 12" to 24" at the bottom edge of the J-channel to allow for water drainage.
Install J-channel at the top of all walls. Fasten every 8" to 12" using the center of the nail slots, allowing for horizontal movement of the vinyl. Create J-channel overlap where needed, following the same procedure shown in illustration.
3. Installation of undersill
Use undersill to start or end panels to be cut and installed at corner post or in J-channel.
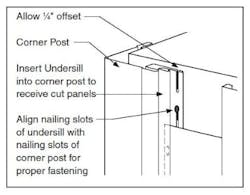
Insert and install a cut length piece of undersill into the corner post or J-channel. Follow the guidelines for placement and fastening as stated in Step 2, ' Installation of J-channel', to allow for proper expansion.
C. PANELS
Installation of vertical panels should always begin at a corner.
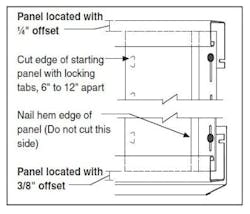
Cut the length of the panel. Determine the overall panel height needed, then subtract for cut backs. Each panel is required to be placed with a 1⁄4" offset from the top J-channel and 3⁄8" offset from the bottom J-channel starter course to allow for expansion and contraction.
Note: If no J-channel starter course is used, panels will still require a 3/8" offset at the bottom to allow for any downward expansion.
Cut the width of the panel. Mark a cut line by measuring from the nail hem edge. Do not cut off the nail hem. Use a snap lock punch to create locking tabs along the cut edge, every 6" to 12".
Insert the punched edge into the undersill. Position panel with the required top and bottom offsets. Use a level to ensure panels are plumb. Fasten nail slot side of panel with the first fastener placed in the uppermost end of the top nail slot. All other fasteners are placed in the center of the slot, every 8" to 12" apart.
It is critical for all vertical panels to be fastened as noted, the first fastener placed in the uppermost end of the top nail slot with all other fasteners placed in the center of the slot. This practice will allow for expansion in the downward direction, eliminating the risk of panels warping.
D. STACKING COURSES
A second course will be required for heights over 120". Create a transition strip by installing two strips of J-channel back-to-back with flashing between. Refer to illustration shown.
Leave the required 1⁄8" offset between the bottom of the J-channel and flashing as previously done.
Sponsored by:
